How to Write a Blog Post 10x Faster With AI: The Step-by-Step Workflow (2026)
Table of Contents
A 1,500-word blog post used to take the better part of a working day.
Keyword research: 45 minutes. Competitor analysis: 30 minutes. Outline: 20 minutes. First draft: 90 minutes. Editing: 45 minutes. SEO formatting and internal links: 30 minutes. Featured image: 20 minutes.
Add it up, and you are looking at four to six hours — before you have even thought about publishing.
In 2026, that same article can be done in under 45 minutes. Not by cutting corners, and not by publishing AI slop that reads like it was generated by a broken autocomplete. The output is researched, structured, SEO-ready, and written in your voice — because you are not replacing yourself with AI, you are using it to handle the time-consuming scaffolding so your expertise and editing are where the value actually sits.
This guide walks through the exact workflow, tool by tool, step by step. You will need three tools, a clear topic, and about 45 minutes.
Why Most People Use AI Wrong for Blog Writing
Before the workflow, a word about the mistake that produces bad AI content.
Most people open ChatGPT, type “write me a 1,500 word blog post about [topic]”, paste the result into WordPress, and publish it. The output is generic, superficial, and structurally identical to ten thousand other articles on the same topic. It does not rank. Readers bounce. The experiment fails, and the conclusion drawn is “AI content does not work.”
The problem is not AI — it is the workflow.
AI tools are not replacement writers. They are scaffolding tools. The best AI-assisted blog workflow uses AI to handle the parts of writing that are slow and mechanical — keyword research, competitor analysis, structural outlining, first-draft generation, grammar and clarity editing — while keeping the human in charge of expertise, fact-checking, voice, and editorial judgement.
AI writing tools save time on first drafts, not on thinking. That sentence is worth holding onto before starting.
The workflow below builds on that principle.
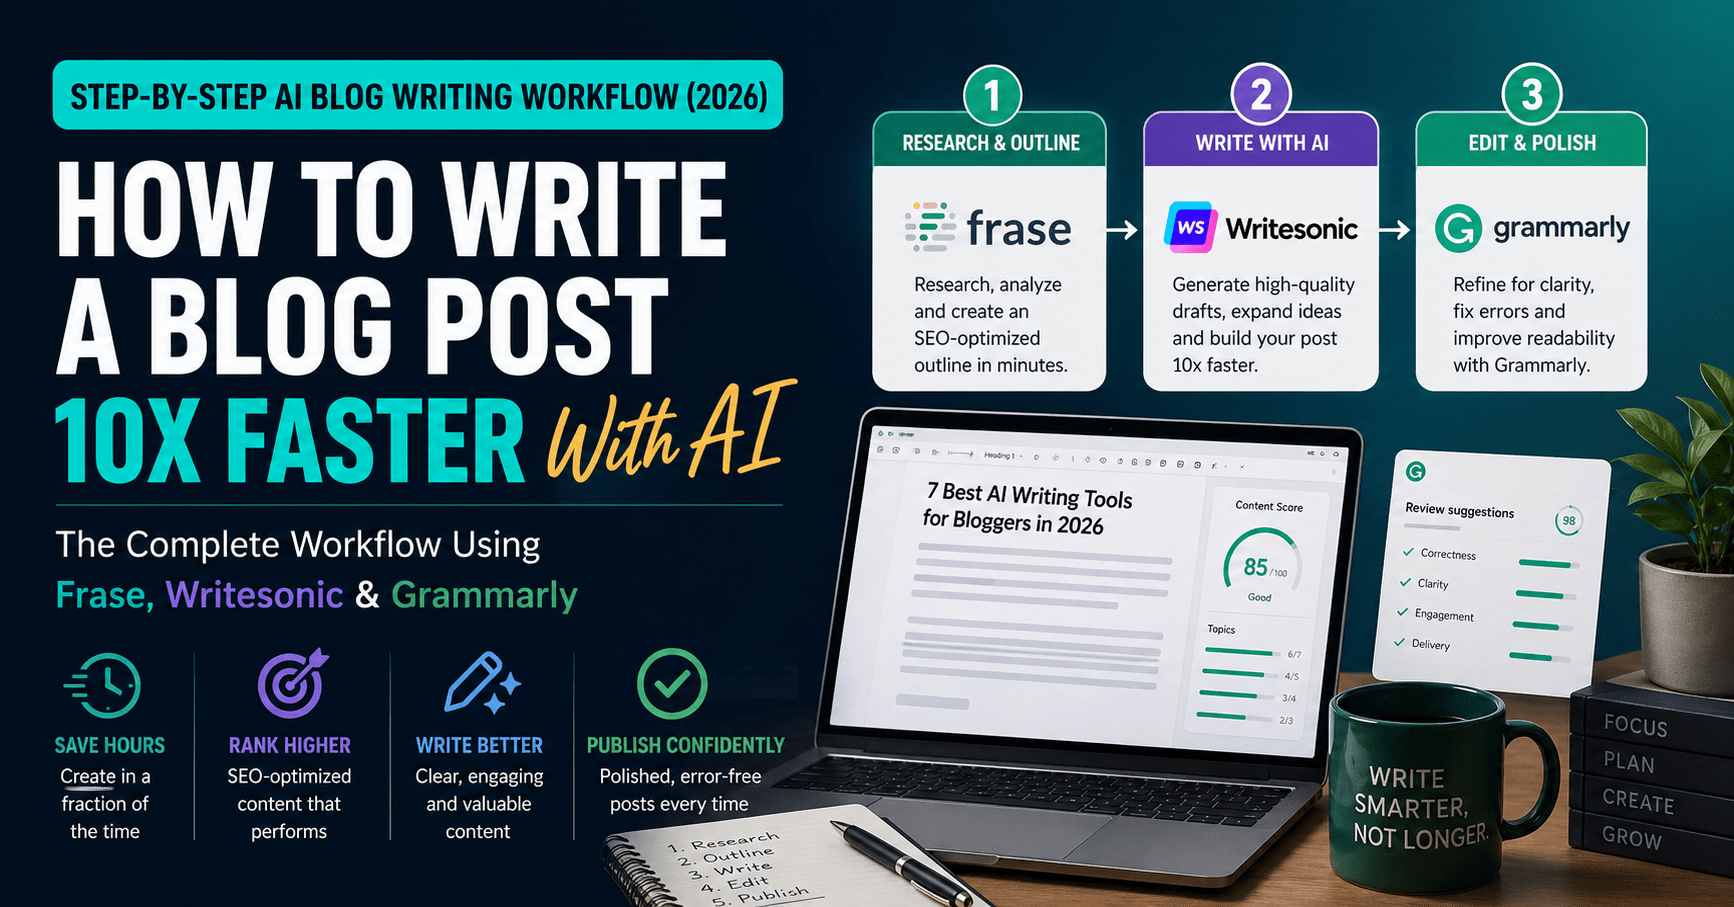
The Three Tools You Need
You do not need ten tools. You need three, each doing a distinct job.
Frase ($14.99/month) — Research and SEO brief. Frase pulls the top-ranking pages for your target keyword, analyses what they cover, and builds a content brief that tells you exactly what your article needs to include to be competitive in search.
Writesonic (free–$16/month) — First draft generation. Writesonic’s Article Writer produces structured long-form drafts with real-time web access, meaning the content it generates reflects current information rather than frozen training data.
Grammarly (free–$12/month) — Edit and polish. The final quality layer. Grammarly catches grammar and spelling errors, improves sentence clarity, adjusts tone, and checks for plagiarism before you publish.
Total stack cost: $27–$43/month — less than a single hour of freelance writing fees, and it scales to as many articles as you can publish.
If budget is a hard constraint, you can substitute ChatGPT Plus ($20/month) for both Frase and Writesonic as a starting point, though the SEO research capability drops significantly. The three-tool stack is the better long-term investment.
The Full Workflow: Step by Step
Step 1 — Pick Your Keyword and Validate It (5 minutes)
Before opening any tool, you need a clear target keyword and a confirmation that real people are actually searching for it.
Use Google’s autocomplete as a free sanity check: start typing your topic and see what Google suggests. Every suggestion is a real search people are making. The autocomplete for “how to write a blog post” includes: “faster”, “with AI”, “step by step”, “for beginners”, “that ranks” — all viable keyword variants with genuine search volume.
For a free keyword volume estimate, use Google Keyword Planner (free with a Google account) or Ubersuggest’s free tier. What you are looking for: monthly search volume above 500, and keyword difficulty low enough that an independent blog can rank.
Quick validation rule: If Google autocomplete suggests it and you can find three to five articles on the first page from independent blogs (not just Forbes, HubSpot, and Wikipedia), there is room for you to rank.
Write your keyword down. Everything that follows is built around it.
Step 2 — Build Your Content Brief in Frase (10 minutes)
Frase is the step most AI bloggers skip, and it is the step that determines whether your article ranks or disappears on page four.
Here is what to do:
- Create a new document in Frase and enter your target keyword
- Frase immediately pulls the top 20 ranking pages for that keyword and analyses them: their word counts, headings, topics covered, questions answered, and related terms used
- Review the “Questions” tab — this shows you every question real searchers are asking about your topic, sourced from Google’s People Also Ask and related queries. These become your FAQ section
- Click “Brief” to auto-generate a content outline based on what the top-ranking articles actually cover
- Adjust the outline — add your own angle, remove sections that don’t fit your audience, reorder headings to create a logical flow
What you end up with: A data-driven content brief that tells you exactly what headings to include, which related terms to use naturally in your copy, roughly how long the article should be to compete, and what questions your FAQ should cover.
This step takes 10 minutes and is the difference between an article that ranks and one that does not. Do not skip it.
Time saved vs. manual research: A thorough manual SERP analysis of the same depth takes 30–45 minutes. Frase does it in under two minutes.
Step 3 — Generate Your First Draft in Writesonic (10 minutes)
With your Frase brief in front of you, open Writesonic and use the Article Writer feature.
- Enter your target keyword and article title
- Paste in your Frase outline as the structure (Writesonic lets you edit the outline before generating)
- Select your tone — for most blog content, “informative and conversational” works well
- Enable web search (Writesonic’s real-time research feature) so the draft includes current data and examples rather than relying solely on training data
- Generate
Writesonic will produce a full first draft, typically 1,200–1,800 words, in around 30–60 seconds.
Important: do not publish this draft. It is a scaffold, not a finished article. What you have is a well-structured starting point that covers the right topics in roughly the right order. Your job now is to transform it.
Step 4 — Add Your Voice and Expertise (15 minutes)
This is the most important step — and the one AI cannot do for you.
Read through the Writesonic draft and make these edits:
Replace generic examples with specific ones. AI drafts default to vague, universal examples. Swap them for real tools, real numbers, real experiences. “Some tools save time” becomes “Writesonic cut my first-draft time from 90 minutes to under 10.”
Add your personal angle. What do you think about this topic that is not already said in the top ten results? What have you personally tried, tested, or discovered? One or two genuine first-person insights per article make the difference between generic AI content and a real article.
Verify every factual claim. AI hallucination is real. Every statistic, date, product name, pricing figure, and company claim in the draft needs to be manually checked before publishing. Open the sources in Frase or Google the specific claims. Remove or correct anything you cannot verify.
Inject your keyword naturally. Check that your primary keyword and the related terms from your Frase brief appear in the first 100 words, at least one H2, and the conclusion. Do not stuff — just ensure natural inclusion.
Add internal links. Link to other relevant articles you have already published. Three to five internal links per article tells Google your content is part of a coherent topic cluster, which improves rankings for all linked pages.
Time invested here: 15 minutes. This is where the value actually lives. The AI built the structure; you fill it with genuine expertise.
Step 5 — Edit and Polish With Grammarly (5 minutes)
With your edited draft ready, paste it into Grammarly or use the browser extension if you are working directly in WordPress or Google Docs.
Grammarly will scan for:
- Grammar and spelling errors
- Unclear or overly complex sentences (it flags and suggests clearer rewrites)
- Passive voice overuse
- Tone inconsistencies
- Potential plagiarism
Work through Grammarly’s suggestions selectively — accept rewrites that genuinely improve clarity, reject ones that remove your voice. The goal is not to make the article perfectly clinical; it is to ensure it reads smoothly and professionally.
One underrated use: Grammarly’s tone detector. It tells you whether your article reads as confident, friendly, analytical, or formal. If the tone does not match your intended audience, this is where you catch it before publishing.
Time invested: 5 minutes. Grammarly’s suggestions are fast to review and the quality uplift is consistently worth the time.
Step 6 — SEO Final Checks and Publish (5 minutes)
Before hitting publish, run through this checklist in Rank Math (or Yoast if that is your plugin):
- Focus keyword entered in the SEO plugin
- Title tag contains the keyword (ideally near the start)
- Meta description written — 150–155 characters, includes keyword, reads as a genuine reason to click
- Excerpt written — 2–3 sentences, different from the meta description, shows on your blog archive page
- H1 matches or closely mirrors your target keyword
- Featured image uploaded with alt text containing the keyword
- Internal links to two or three related articles on your site
- External links to one or two authoritative sources (Frase’s research tab will have given you these)
Frase also shows you a live content score as you edit — a percentage indicating how well your article covers the topic compared to the top-ranking competitors. Aim for a score of 70 or above before publishing.
Hit publish.
The Full Time Breakdown
| Step | Task | Old Way | AI Workflow |
|---|---|---|---|
| 1 | Keyword research and validation | 45 min | 5 min |
| 2 | Competitor research and brief | 40 min | 10 min |
| 3 | First draft | 90 min | 10 min |
| 4 | Add voice, expertise, examples | 30 min | 15 min |
| 5 | Edit and polish | 30 min | 5 min |
| 6 | SEO and publish | 20 min | 5 min |
| Total | ~4.5 hours | ~50 min |
The dramatic saving is in steps 2 and 3 — research and drafting. These are the mechanical, time-consuming parts of writing where AI genuinely excels. Steps 4 through 6 — the human layer — are unchanged in investment but represent a smaller portion of the total.
What AI Cannot Do (And Should Not Try To)
This workflow produces excellent first drafts. It does not remove the need for human judgement.
AI cannot provide genuine experience. A review based on actually using a tool, a recommendation rooted in personal failure, a counterintuitive insight born from practice — these are things no AI can generate from a keyword. They are what make your articles worth reading and returning to.
AI cannot fact-check itself reliably. Every statistic and claim in an AI-generated draft should be verified before publishing. This is non-negotiable.
AI cannot build authority. E-E-A-T (Experience, Expertise, Authoritativeness, Trustworthiness) — the signals Google uses to evaluate content quality — cannot be faked by word count or keyword density. They come from consistently publishing accurate, specific, useful content over time.
AI cannot replace an editorial strategy. Choosing what topics to cover, which angles to take, which audience to serve, and how your content fits into a larger content plan — all of that remains a human decision.
Use the workflow above to handle the scaffolding. Bring your expertise, your perspective, and your editorial judgement to everything else.
Tips to Get Better Output From Writesonic
The quality of your AI draft depends heavily on how clearly you brief the tool. A few adjustments that consistently improve output:
Be specific about your audience. “A blog post for freelancers using AI tools” produces better output than “a blog post about AI writing.” The more specific the audience, the more targeted the tone and examples.
Give it your outline, not just a title. Pasting your Frase-generated outline into Writesonic before generating means the draft follows a research-backed structure rather than a generic AI-guessed one.
Use the web search toggle. Enabling real-time web research ensures the draft references current tools and pricing rather than outdated training data. For any technology or product topic, this is essential.
Generate in sections if needed. For longer articles (2,000+ words), generate the introduction and each major section separately. This gives you more editorial control and produces more focused output per section.
Iterate, do not start over. If a section is weak, ask Writesonic to rewrite it with a specific instruction (“make this more practical and example-driven”) rather than regenerating the whole article. Targeted iteration is faster than starting from scratch.
The Budget Version of This Workflow
If $43/month feels like too much to start, here is a reduced version:
ChatGPT Plus ($20/month) replaces both Frase and Writesonic. You lose the automated SERP research and the structured article writer, but you gain a flexible tool that can do both with the right prompts:
- For research: “Analyse the top-ranking articles on [keyword] and tell me the key subtopics I need to cover, questions readers commonly ask, and what word count I should target.”
- For drafting: “Using this outline [paste outline], write a 1,500-word first draft for an article targeting [keyword]. Tone: conversational and practical. Audience: [describe your audience].”
Grammarly’s free plan covers the editing layer at no cost.
Budget stack: $20/month total. You will spend an extra 20–30 minutes per article on manual SERP research that Frase would automate, but the workflow is otherwise the same.
Upgrade to the full three-tool stack when you are publishing consistently and the time savings justify the spend.
Frequently Asked Questions
Will Google penalise AI-written blog posts?
No. Google’s guidelines evaluate content quality and usefulness, not the process used to create it. AI-assisted content that is accurate, well-structured, and genuinely helpful to readers is treated the same as human-written content in search rankings. The risk is not from using AI — it is from publishing low-quality, generic output without human editing and expertise added. Follow the workflow above and your articles will be indistinguishable in quality from manually written ones.
How do I make AI content sound like me and not like a robot?
The key is Step 4 of the workflow — adding your voice, specific examples, and personal perspective after the draft is generated. Beyond that, train Writesonic’s brand voice feature by pasting in two or three examples of your own best writing. The tool will adjust its output to match your tone. Also use Grammarly’s tone detector to catch generic or overly formal phrasing before publishing.
What is the best AI tool for writing blog posts for beginners?
For complete beginners, start with ChatGPT Plus ($20/month) as a single flexible tool for both research and drafting. It requires more manual effort than the three-tool stack, but the lower cost and single interface make it easier to learn the workflow before adding complexity. Once you are publishing consistently, add Frase for SEO research ($14.99/month) as your next upgrade.
How long should an AI-assisted blog post take to write?
Using the full three-tool workflow described in this article, a 1,500-word article takes approximately 45–55 minutes from keyword to publish-ready draft. A 2,500-word in-depth guide takes 75–90 minutes. The time is almost entirely spent in Step 4 (adding expertise) and Step 6 (SEO and publishing). The AI handles research and drafting in under 20 minutes combined.
Do I need to fact-check everything AI writes?
Yes — always. AI tools can produce confident-sounding claims that are factually incorrect, outdated, or fabricated entirely (known as hallucination). Every statistic, pricing figure, product name, and company claim in an AI draft should be verified against the original source before publishing. This is non-negotiable for maintaining reader trust and editorial credibility. Frase helps by providing the source articles your brief is based on, making fact-checking faster.
Can this workflow work for affiliate review articles as well as how-to posts?
Yes, with a slight adjustment. For review articles, Step 4 expands significantly — you need to add your genuine assessment of the product, real pros and cons, and specific use-case guidance that the AI cannot generate from a keyword alone. The research and drafting steps are the same. The human layer is more important for reviews than for how-to posts, because readers are making a purchasing decision based on your article.
Final Thoughts
The question is not whether to use AI for blog writing — in 2026, the question is how to use it without producing content that everyone ignores.
The answer is a workflow, not a single tool. Research with Frase, draft with Writesonic, polish with Grammarly, and build the layer of genuine expertise and voice that AI cannot replicate. That combination is what produces articles that rank, get read, and build an audience.
The four-hour blog post is now a 45-minute one. That time difference compounds. One article per week becomes four. Four articles per month becomes forty-eight per year. At scale, the content library builds, the SEO authority grows, and the passive income from affiliate commissions and ad revenue compounds quietly in the background.
Start with the first article. Use the workflow. See how long it actually takes.
→ Try Frase for $1 (5-day trial) → Get started with Writesonic free → Try Grammarly for free
Continue reading: